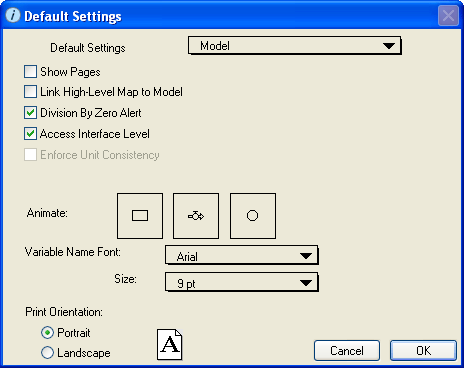
Use the Default Settings dialog box to set default values for many of the interface, model, equation, and run preferences that you can set for your model.
Note: You can override most default settings for a specific model or item in a model by editing the setting for the model or item in the appropriate dialog box.
To open this dialog box, choose Default Settings from the File menu on any model layer.
Select the category of default settings that you want to set: Model, Object, Stock/Flow/Converter, Table/Graph, Text Block, or Run Specs. When you select a category here, the dialog box displays the options for that category.
Use the Model options to select default settings for several of the interface, model, and equation preferences for your models.
Note: You can control these settings for a specific model in the Interface Preferences, Model Preferences, and Equation Preferences dialog boxes.
Select this check box to display page numbers and page boundaries (displayed as dashed lines) on the Map, Model, and Equation layers. When page numbers are shown, they will also be printed when a layer is printed.
This is a global setting.
Note: You can control this setting per layer in the Interface Preferences, Model Preferences, and Equation Preferences dialog boxes.
Select this check box to enforce a one-to-one correspondence between high-level mapping entities (process frames, bundled flows, and bundled connectors) on the Interface layer and their corresponding entities on the Map and Model layers (sectors and their connected flows and connectors).
This is a global setting.
Select this check box to stop the current model simulation run and display an alert message when division by zero occurs during the run. The alert message indicates which model entity caused the division by zero.
If this check box is not selected, the model continues to generate data when division by zero occurs.
This is a global setting.
Note: You can control this setting for the current model in the Model Preferences dialog box.
Select this check box to display the Interface layer.
If this check box is not selected, the Interface layer is hidden.
This is a global setting.
This option is not available in the current version.
Select the types of building blocks (stocks, flows, and converters) that you want to be animated during model simulations.
To select a building block for animation, click its icon once. A rectangle around the building block icon means that the building block will be animated. To de-select a building block, click it again to remove the rectangle.
 – Select this option to animate all stocks in your models.
 – Select this option to animate all flows in your models.
 – Select this option to animate all converters in your models.
This is a global setting.
Note: You can control this setting for the current model in the Model Preferences dialog box.
Select the default font style for object and building block names on the Interface, Map, and Model layers, and for all text on the Equation layer.
This is a global setting.
Note: You can control this setting per layer in the Interface Preferences and Model Preferences dialog boxes.
Select the default font size for building block and object names on the Map/Model layers.
This is a global setting.
Note: You can control this setting for the current model in the Model Preferences dialog box.
Select the default page orientation when printing models: Portrait or Landscape.
This is a local setting.
Note: You can control this setting for the current model in the Print Setup dialog box (from the File menu, choose Print Setup).
Use the Object options to select default selections for object-related settings, including displaying navigation arrows and the name of the associated entity, and retaining ending values.
Note: You can override these default settings for a specific object by selecting the option you want in the object's definition dialog box.

Select this check box to display a navigation arrow ( ) on objects that have this feature.
This option affects knobs, sliders, numeric displays, list input devices, graphical input devices, table pads, and graph pads.
This is a local setting.
Select this check box to have numeric displays and status indicators continue to display their final value after the end of a simulation run.
If you do not select this check box, numeric displays and status indicators "go blank" at the end of a simulation run and do not display any value.
Note: You can override this setting for a specific numeric display or status indicator in the object's dialog box.
This is a local setting.
Select this check box to display the name of the associated entity above or next to the object on the model diagram.
If you do not select this check box, no name is displayed for the object.
Note: You can override this setting for a specific numeric display or status indicator in the object's dialog box.
This option affects switches, graphical input devices, knobs, list input devices, sliders, status indicators, and numeric displays.
This is a local setting.
Use the Stock/Flow/Converter options to select several default settings for flows, stocks, and converters.
Note: You can control these setting for a specific stock, flow, or converter in the building block's definition dialog box.
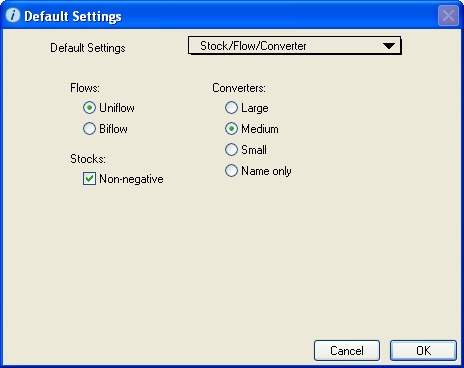
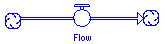
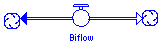
Select the default type for flows in your models:
Uniflow – The flow moves in one direction only. With uniflows, the flow volume will take on non-negative values only. On the other hand, biflows can take on any value.
Biflow– The flow moves in two directions. With biflows, the flow volume can be any value (negative or positive). If you specify a flow as a biflow, a second, shaded arrowhead appears on the flow to point in the direction of the negative flow. It is not possible to have a biflow connected to a conveyor, queue, or oven.
This is a local setting.
Select the Non-negative check box to ensure that flows will not force stocks to take on negative values.
This is a local setting.
Select the default size for converters used in the model: Large, Medium, or Small. To have just converter names appear only, instead of both converter names and icons, select the Name only option.
This is a global setting.
Note: You can control this setting for converters in the current model in the Model Preferences dialog box.
Use the Table/Graph options to select several default settings for table pads and graph pads.
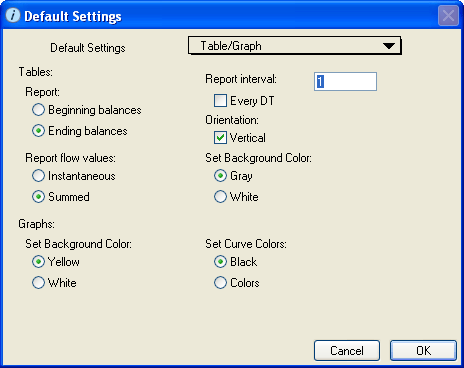
Note: You can control these setting for a specific table pad in the table's Define Table dialog box.
Report
Use the options in this section to select whether reported values for stocks, flows, and converters are from the beginning of each report interval or from the ending of each report interval. For more information and examples, see Reporting values in tables.
- Beginning balances – Select this option to report stock, flow, and converter values from the beginning of each report interval.
- Ending balances – Select this option to report stock, flow, and converter values from the end of each report interval.
This is a global setting.
Report flow values
Use the options in this section to select how to report table values for flows. For more information and examples, see Reporting values in tables.
- Instantaneous – Select this option to report flow values as instantaneous values.
- Summed – Select this option to report flow values as the sum of the flow's values over the report interval. The values for flows are displayed as the amount that actually increments (or decrements) the stock over the report interval you have specified. When the report interval is larger than DT, the flow values that are displayed will be the sum of the flow values that would have been displayed for each DT during the report interval.
This is a global setting.
Report interval
Use the options in this section to specify the default interval at which values are reported in tables. For example, if your model's unit of time is Months and you define a report interval of 2, the table will display values for every second month (February, April, June, etc.). The default report interval is 1.
To specify a specific report interval value, type a value in the Report interval box that is greater than or equal to DT, and less than or equal to the time at which you have specified your simulation to end.
Note: The Report interval box is not available when the Every DT check box is selected.
- To report values at every DT, select the Every DT check box. Selecting this option is helpful when you are debugging your model because you can see the results of the calculations as the calculations are made.
This is a global setting.
Orientation
Select the Vertical check box to format output in all tables in vertical columns (entity names are listed at the top of each table column, and their values are displayed below each entity).
If you do not select this check box, table output is formatted in horizontal columns (entity names are listed along the left side of the table, at the start of each row, and their values are displayed to the right of each entity).
This is a local setting.
Set Background Color
Use these options to select the default color for table backgrounds: Gray or White.
Note: To set the background color for a specific table, use the paintbrush tool in the table.
This is a local setting.
Note: You can control all of these settings (except the background color and curve color) for a specific graph pad in the graph's Define Graph dialog box.
Set Background Color
Use these options to select the default color for graph backgrounds: Gray or White.
Note: To set the background color for a specific graph, use the paintbrush tool in the graph.
This is a local setting.
Set Curve Colors
Use these options to select the default color for curves in graphs:
- Black– Select this option to have all curves in the graph be black.
- Colors– Select this option to have the software assign a different color to each curve in a graph.
Note: To set the curve color for a specific graph, use the paintbrush tool in the graph.
This is a local setting.
Use the Text Block options to select default settings for text boxes in your models.
Note: You can control these settings for a specific text box in the Text Box dialog box.

Click this box to select the default font type for the text in text boxes.
This is a local setting.
Click this box to select the default font size for the text in text boxes.
This is a local setting.
Use the options in this section to select the default alignment for text in text boxes: Left, Center, or Right.
This is a local setting.
Use the options in this section to select the default style for text in text boxes: Bold or Italic. To use plain text by default, do not select either check box.
This is a local setting.
Select the default style of border you want for text boxes.
This is a local setting.
Displays sample text that shows your current default text box settings (style, alignment, font type, and size).
Use the Run Specs options to select default settings for all simulation runs for your models.
Note: You can control these setting for a specific model run in the Run Specs dialog box.
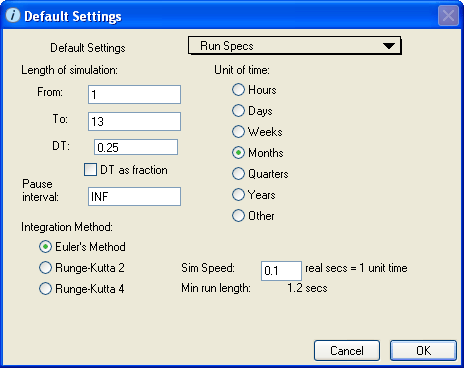
Use the options in this section to specify the default length of model simulations.
From / To
Use these boxes to specify the start and end values for the length of the simulation. The values you enter must be numerical.
The values you enter here depend on the unit of time selected for the model. For example, if the unit of time is Months and you want to run the simulation for a year (12 months), you would specify 1 and 13 as the From and To values. Alternatively, if the unit of time is Years and you wanted to run the simulation from one specified year to another, you could type 1970 and 2010 as the From and To values, or, if you wanted to run the simulation for 100 years, you could type 1 and 101 as the From and To values.
The value in the "To" box must be greater than the value in the "From" box.
Note: If the value in the DT box is greater than 1 and is not evenly divisible into the length of simulation specified by the From and To values, the software will choose the closest length of simulation that is a multiple of DT.
This is a global setting.
DT
Specify the simulation time step (DT), either by specifying a value in the box, or by specifying DT as a fraction.
- To specify a value, type a number that is less than or equal to 1 or an integer that is greater than 1.
- To specify DT as a fraction, select the DT as fraction check box, then, in the "DT :1/" box, type the number of calculations to occur per time unit.
Regardless of the method you use, choose a DT that is small enough to enable you to capture the shortest time frame of interest in your model. The trade-off here is speed versus accuracy. The more calculations the computer has to make per unit of simulation time, the longer it will take to complete any given simulation. For more about DT, see Overview: DT.
This is a global setting.
Specify the default length of time that you want model simulations to pause during a run.
For example, if the unit of time is Months and the length of the simulation is a year, but you want the simulation to pause every quarter, you would enter 3 as the pause interval.
To have the simulation run without pausing., specify the pause interval as infinity by entering INF (Windows) or by pressing Option+5 (Mac). This is the default setting for the pause interval
When the Pause interval is set at a value less than the length of the simulation, model simulation runs will pause as you have specified. Users then can inspect results. They also can change model constants, and then resume the simulation run by choosing Run from the Run menu. Thus, your models can be set up in a gaming mode for users.
This is a global setting.
Select the default integration method that you want to use for simulation runs:
For detailed information about these integration methods, see Overview: Integration methods.
This is a global setting.
Specify the default time unit for model simulations. Select one of the pre-defined units (Hours, Days, Weeks, etc.), or select Other to specify your own.
The unit of time you select is used for display purposes.
This is a global setting.
Use this option to slow down the speed of simulations by specifying the number of real seconds that are equivalent to 1 unit time. To run the simulation as fast as possible, enter 0 in this box.
By slowing the simulation down, you allow the model's user time to react to changes in the model.
This is a local setting.
Displays the minimum run length, based on the simulation speed and unit of time you specify.
Select this check box to store model output for all entities in a model.
When you select this check box, a small graph appears when you hover the mouse pointer over entities when the model simulation is paused or stopped.
This is a local setting.
Note: For the current release, Analyze Mode is turned on. You cannot turn it off.